 Skip to content


Using Multiple Hair Extension Techniques - Tape Micro Ring Hair Extensions
When fitting hair extensions, the method you select is not always a one-size-fits-all decision. If you have a client looking for tape hair extensions like our client today, you may find that the back of their head is suitable for tape hair extensions, and the front section is not. In our client's case, the front area of our client's hair is finer than the back, meaning that it may not be able to hide tape hair extensions very well at the sides. In addition to this, our client has a small blonde face frame and using a method such as micro rings is better at mimicking the colour pattern at the front of our clients head.

Therefore, we have advised our client to tape hair extensions at the back of her head and micro ring hair extensions around the front for a seamless blend and finish.
Step 1: Before we begin, we need to colour match our client's hair. In our client's case, she has a warm auburn hair colour; therefore, we are using a mix of #6, #7 and #16 around the face. Ensure that your client is sitting in natural light to see her hair colour better, then use your colour ring to find the most accurate colour match.
Step 2: Use your scissors to trim the ends of the client's hair and remove any bulk or harsh lines, as this will make blending the hair extensions much easier once they have been fitted.
Step 3: Section your client's hair behind the ears to pull the front sections out of the way, and then part the hair at the back through the middle so that you have created four sections in total. Use a pintail comb to create clean sections and use sectioning clips to keep the hair out of the way.
Step 4: Section the hair for your first row for hair extensions. Leave enough hair at the nape of the neck to hide the hair extensions when they are pulled up. To stop any flyaway hairs from getting stuck in the tape pieces, use velcro grippers to keep your work area free from any rogue hairs.

Step 5: Apply your first row of tape, making sure to leave 1-2 fingers away from the hairline, so the hair extensions are not visible when the hair is pulled back.
Step 6: Work your way up the back of the head, checking once you reach the top of the head that the hair extensions are not visible and there is enough of a layer of hair that hides the tapes.
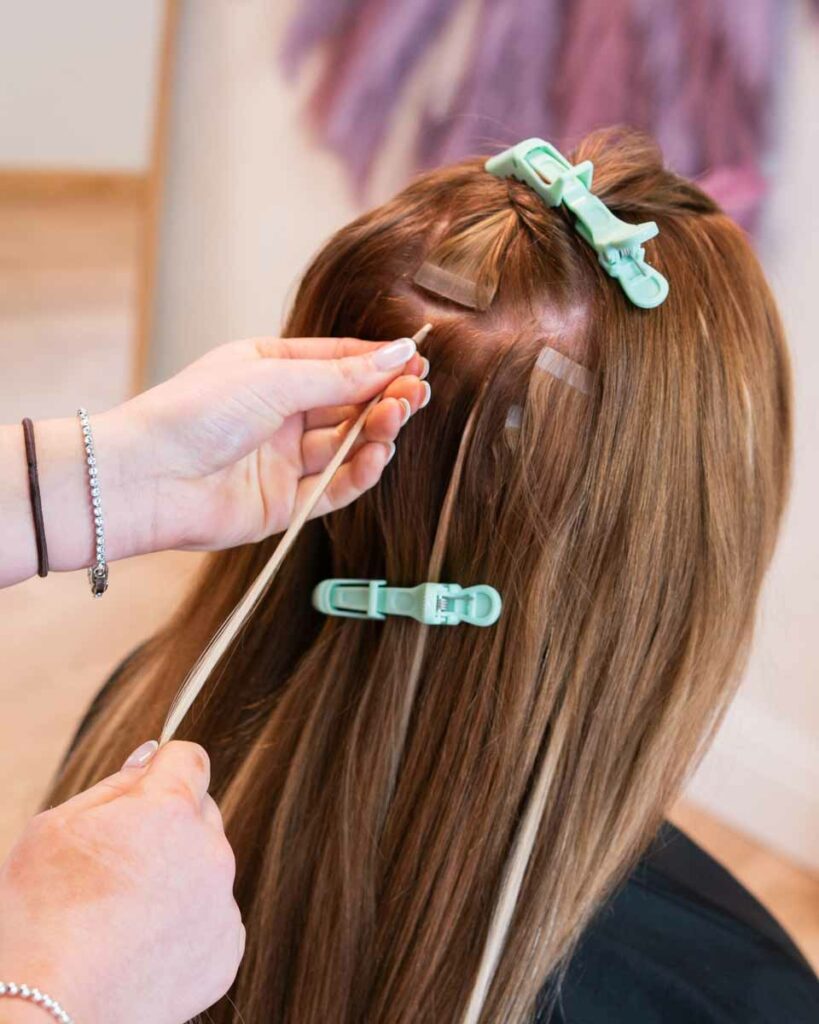
Step 7: Now, you can move onto the sides to fit micro ring hair extensions. You must perform another colour match for your ring colour to make sure you are selecting the most easily camouflaged colour for her hair.
Step 8: Like the tape hair extensions, apply your micro rings and leave enough hair at the hairline/crown of the head to fully conceal the hair extensions. You will need a pulling needle, micro rings (we have used non-silicone lined microtubes in light brown), and hair extension pliers to apply micro tubes correctly.
Step 9: Once you have applied all of your hair extensions, you can trim around the face to ensure the hair extensions are blending with the natural hair, and then you are ready to style!


